Techniques used to reduce render times in Blender's Cycles engine without significantly sacrificing render quality
Written by Tinos Psomadakis
20/03/2021
Introduction
As part of my A-Level Graphic Design course, I created a housing estate with ten floors; each floor has
different rooms, which act as a vertical timeline. The top floor is the hospital corridor that the
protagonist
was born in and the bottom floor is the current day. The camera will slowly pan down the building,
momentarily stopping on each floor to allow viewers to see the room in all of its glory.
To help create each floor, I used the BlenderKit
plugin for materials and models, some of which I created myself.
Specification
Scene
- Blender version: 2.92.0
- Blender engine: Cycles
- Cycles render device: OptiX - GPU & CPU
- Frames: 1500
- Samples: 300
- Resolution: 1600x900
- Framerate: 60fps
- Denoising: OptiX
- Render tiles: 128x128
- Render tile order: Hilbert Spiral
- Render Format: JPEG 90% Quality
- Objects: 3,000*
- Vertices: 1,600,000*
- Edges: 3,000,000*
- Faces: 1,500,000*
- Triangles: 3,100,000*
Hardware
- GPU: ZOTAC GAMING GeForce RTX 2080 AMP
- CPU: Intel(R) Core(TM) i7-9700K CPU @ 3.60GHz
- RAM: 32GB G.Skill Trident Z RGB (4x8GB) 3200MHz DDR4
- Operating System: Windows 10 Pro Version 2004
The issues
Errors and proposed solutions
During the creation of the project, I had completely ignored the focus on memory management and
optimization. This would come back to haunt me when the Video RAM (VRAM) needed by Cycles would begin to
surpass the amount of VRAM available on my GPU. I noticed that the issue would usually arise when the
render's memory
would approach 12GB of usage, which is interesting considering my GPU only has 8GB of VRAM available.
Once I had passed the 12GB mark, I began noticing frequent crashes during rendering, often
followed by errors such as the following:
Failed to create CUDA context (Illegal address) and Out of memory in
cuMemAlloc(&device_pointer, size)
Both errors appear to stem from using the OptiX denoiser and a lack of available VRAM.
User cgslav at the Blender Stack Exchange wrote the following solution to this post:
" Your scene render is bigger then your GTX 960 memory.
Solution:
Change render to CPU."
While this solution would probably work, switching to CPU based rendering would likely result in drastically slower render times which is not ideal when working under timed pressure. User Richard_Marklew wrote the following under this post:
" You need a graphics card with more memory, use cpu rendering, simplify your scene or a combination off all. Reduce the size of textures If you have subsurf modifiers do you need them at the level being rendered Split the scene down into multiple renders and composite together etc etc"
The first issue that Marklew highlights is that "You need a graphics card with more memory". I'm confident that purchasing a GPU with more VRAM would solve this problem, however because of a tight budget, a lack of online stock and the fact that this is a one-time project that I won't need to do again once my A-levels are complete, this was definitely an unreasonable option to consider. The next solution he proposes is using CPU rendering, which as I mentioned earlier is fairly bothersome when working under timed pressure. Then, he says "simplify your scene" which may come across as quite a difficult task to achieve when dealing with upwards of 3000 objects in a scene. He lists some potential methods of going about handling this such as reducing the size of textures, simplifying subsurface modifiers and splitting the scene into multiple scenes and to stitch them together in post.
BlenderKit
I think it is really important to highlight the fact that I am using the BlenderKit plugin to import models and materials for each floor of the building. The plugin has some incredibly detailed models, some reaching upwards of 1,000,000 faces on a single model. The materials on BlenderKit can also include extremely high quality textures which can sometimes reach upwards of 11,000x11,000 in resolution. This is where I made my mistake. When I started working on this project, I would freely use whichever material and model that I deemed fit for the room. This meant that I had used some models with 100,000+ faces and multiple materials with 8k textures. Having realised this fatal flaw with the scene roughly 80% through the building process, I looked for ways to ensure this doesn't happen again.
The solutions
Texture Resizing
While this is not the first approach I took to fixing this issue, it is certainly the most effective. As
mentioned in the issues section, one of my major oversights was the texture size of the materials that I
was
importing from BlenderKit and my own designs. I initially realised that this was part of the problem
when I noticed that during the Updating Images phase of the render, the text would get
stuck on a certain images such as GWC_SciFi_Panel_06_base_color.png. The first thing I did
to investigate this was to go to the BlenderKit menu and find the material which was using this
texture that appeared to be "clogging up" the render pipeline.
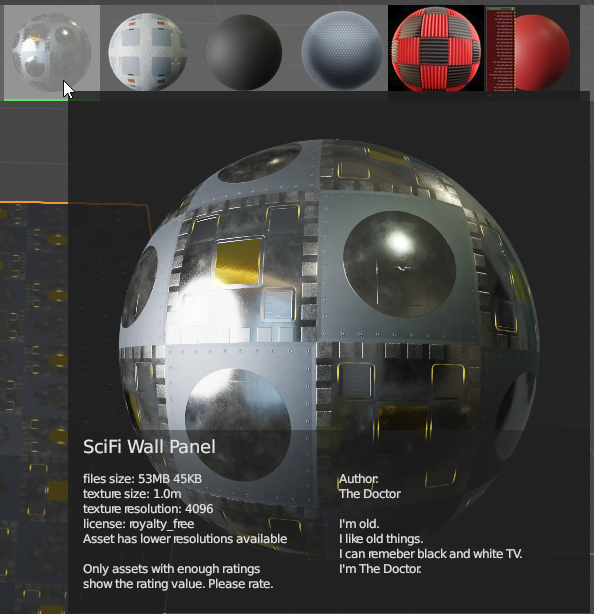
Figure 1 shows a screenshot from the BlenderKit material preview with the material that appeared to be slowing down the render times and using up roughly 200MB-500MB of VRAM. The main thing to note is the texture resolution: 4096 which shows that the textures used by the material are all 4k. Just as Richard_Marklew had predicted, the textures appear to be taking up a great deal of VRAM which would cause the CUDA errors. The way to fix this is the way he had suggested, resizing. Blender's image editor has a built-in resize button which would do the job, however, the scene has over 200 images so having to manually go through and resize each texture one by one would be an incredibly time-consuming and dull task for any human to complete. This is where Blenderpy comes in handy.
I quickly wrote a Python script that would iterate through each image texture in the scene and output the image's size. This was to get an idea of how many of the image textures were larger than 1600 pixels (The render resolution I decided to use).
import bpy

image_sizes = []
for img in bpy.data.images:
    image_sizes.append(max(img.size[0], img.size[1]))

image_sizes.sort(reverse=True)
print(image_sizes)
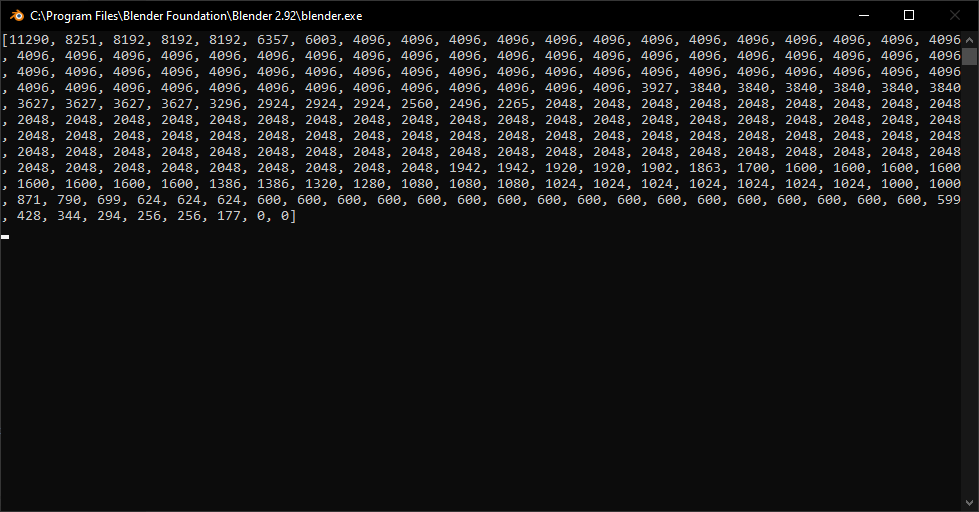
If we take a quick look at the list that the code outputted, we can see that there is one 11k texture, four 8k textures, two 6k textures and around fifty 4k textures. The results really reinforce the importance of having appropriately sized image textures. The next step is to iterate through each texture and resize it to be a MAXIMUM of 1600px.
import bpy

for img in bpy.data.images:
width, height = img.size

if width > 1600 or height > 1600:
    scale_factor = width / height

    if width == height:
        new_width = 1600
        new_height = 1600

    elif width > height:
        new_width = 1600
        new_height = int(1600 / scale_factor)

    elif height > width:
        new_height = 1600
        new_width = int(1600 / (1/scale_factor))

    img.scale(new_width, new_height)
    print(f"\n{width}, {height} => {new_width}, {new_height}")
Figure 3 shows us that the code was successfully run and has now resized all of the textures (above 1600px) to a maximum of 1600px. The VRAM usage went from ~12000MB to an incredible ~4000MB which has managed to shave off at least 30 seconds of render time per frame, roughly 12.5 hours of total time saved.
BlenderKit Models and Materials
The most important numbers to consider when adding models to your scene are the face counts for models and the texture resolutions for materials. With the fix above, the texture resolution can be adjusted fairly easily, however, there is no simple fix for the face count of the models. It is very important that you keep your eyes on the render face count rather than the viewport face count since the model might be using subsurface modifiers which have a large impact on render times.
Material replacing
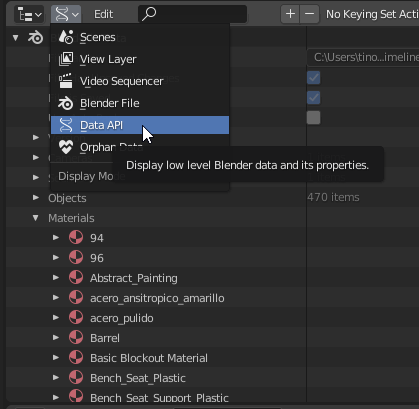
When you import a new model with BlenderKit, it will create all the materials that the model uses. This means that every time you place a new object, even if the materials already exist, you will end up with the same materials being generated twice, which takes up memory and increases file size. I found that the best way of tackling this issue was to look at objects that had similar textures and to create one texture for those objects. For example, I noticed that I had many black plastic objects in my scene so I created a new material, called it Black_MAIN and used the Data API Display Mode under the outliner to see all of the materials in the scene. I would then select each black plastic material and replace the materials of the linked objects with the Black_MAIN material I had created.
The next thing to do is to go through each material and check to see if there are any duplicates. These can easily be spotted as they will end in a number, usually with two trailing zeros (example.001, example.002, example.020). Once you've found a duplicate material, right-click the material and click on Select Linked to select the object(s) using the material. Click on the highlighted object(s) and head over to the Material Properties. Click on the material drop-down menu and select the original material (The material which does not have the .000 numbering). Once you've done this for all the duplicate materials in the scene, it is critical that you ensure that the materials and textures are completely deleted from the scene. This can be done by navigating back to the Outliner's Display Mode options and selecting the Orphan Data option instead. This will display all the pieces of data that aren't being used in the scene but are still being saved in the .blend file. I've found that you need to click the Purge button multiple times to completely delete both the materials and the textures assigned to them. Once this is done, you will have a smaller file size and depending on the material you replaced the duplicates with, a faster render time.